A Dream of Catfish

I had little knowledge of southern food in my childhood. The best part of my childhood was spent growing up in New York City and that didn’t lend itself to much in the way of a fried catfish. I had my first encounter with the delights from south of the Mason-Dixon line when my Dad, sister and I took a road trip to Florida when I was about 6 years old.

Heading south we stopped to visit a friend of my Father’s and ate at a little roadside restaurant. I don’t remember what the place was named but I do remember the crunch of the crust and the realization that fish could also be this.

In a Japanese household you do eat a great deal of sea bounty but that crackling, spicy, crunchy yet juicy wonder that is a plate of southern fried catfish? No indeed! That single plate haunted my dreams for years.

As an adult I tried and tried and tried some more to recreate that masterpiece only to fail time and time again. There were endless experiments with buttermilk and eggs and ratios of flour types…. Nothing worked. It wasn’t that the fish wasn’t tasty , it just somehow couldn’t replicate the texture or flavor of my memory. I started to chalk it up to the amplification of nostalgia when I came across an unassuming paperback cookbook at Oblong Books in Rhinebeck.

The good folks at the best bookshop ever know all about my oddball habits. I come in every week and stay in the cookbook section. I never leave without a cookbook and prefer ones that are either offbeat, regional (especially places I haven’t cooked any food from before) and or promote greater representation of ethnic and racial diversity. So when dear Nicole (The Keeper of the Golden keys aka manager) showed me “I Heart Soul Food” by Rosie Mayes, I couldn’t resist.

Sailing home on a cloud of excitement and loaded down with fresh catfish from Adam’s Fair acre Market, I rolled up my sleeves to try, once again, to recreate my dream plate of fried catfish.

Ingredients: (For the fish)
2lbs Catfish Fillets
1/4c Yellow Mustard
1c Yellow Cornmeal
3/4c Self-rising Flour
2+3/4tsp Seasoning Salt (see recipe below)
1+1/2tsp Paprika
1tsp Black Pepper
2c Vegetable Oil (I used Avocado oil)

(For the Seasoning Salt):
1tsp Kosher Salt
1tsp Garlic Powder
1tsp Onion Powder
1tsp Black Pepper
1/4tsp Paprika
**The Author listed these spices as a suggested mix or that you could buy “Johny’s” brand.

Method:
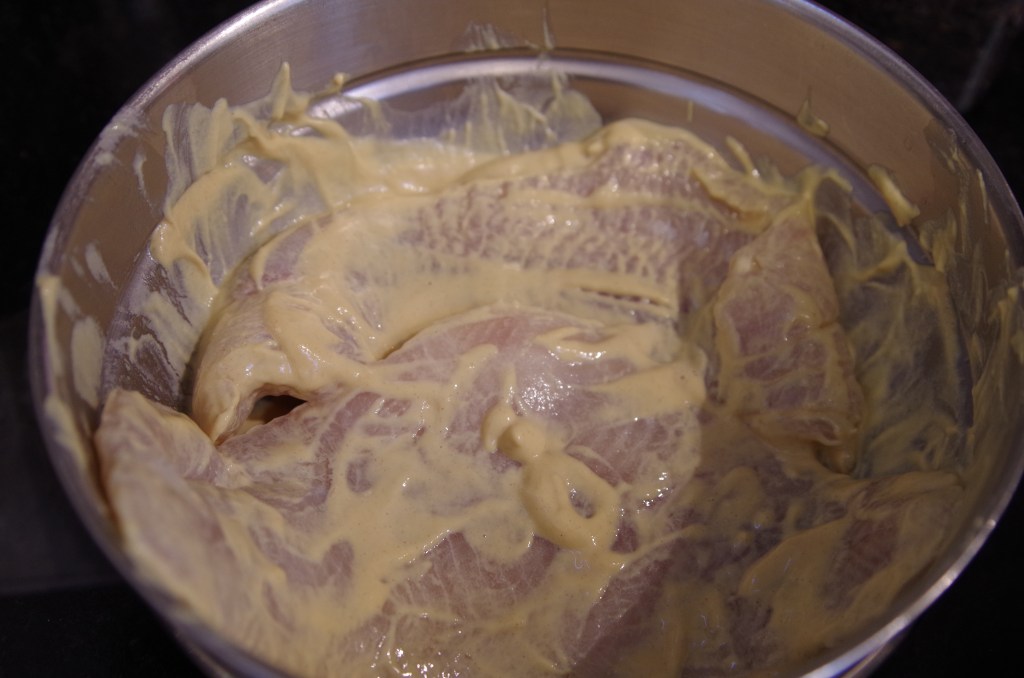
In a large bowl coat the catfish with the yellow mustard. (This was shocking to me. No egg or buttermilk?!)

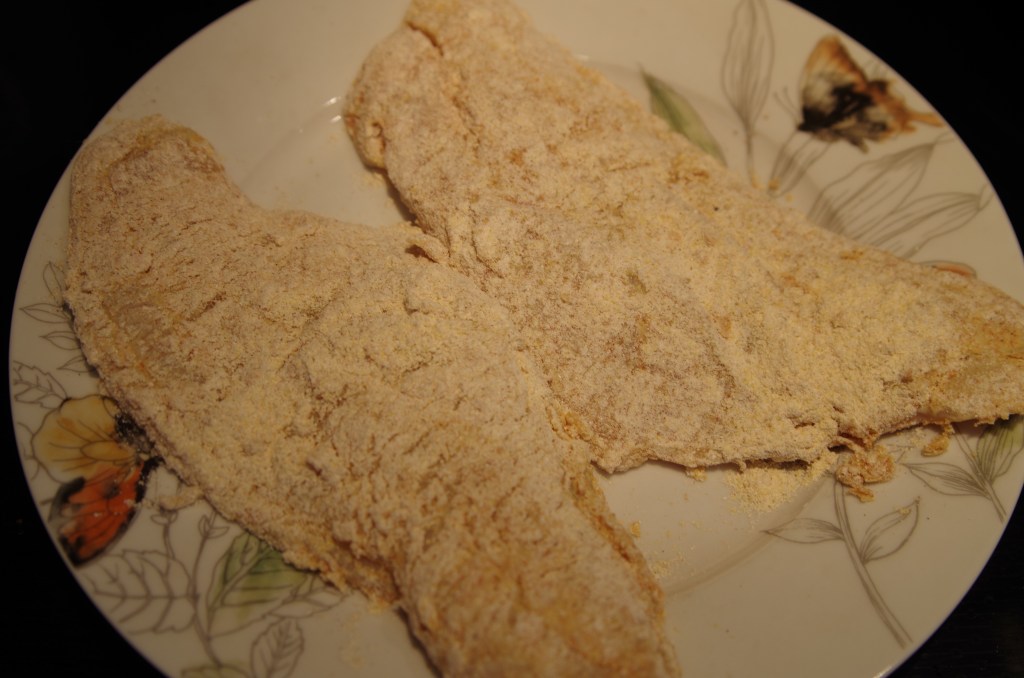
Mix together the cornmeal, flour, seasoning salt, paprika and black pepper and gently coat each fillet.

Heat your oil in a deep frying pan to 350F-360F and fry the fish approximately 5 minutes each side.

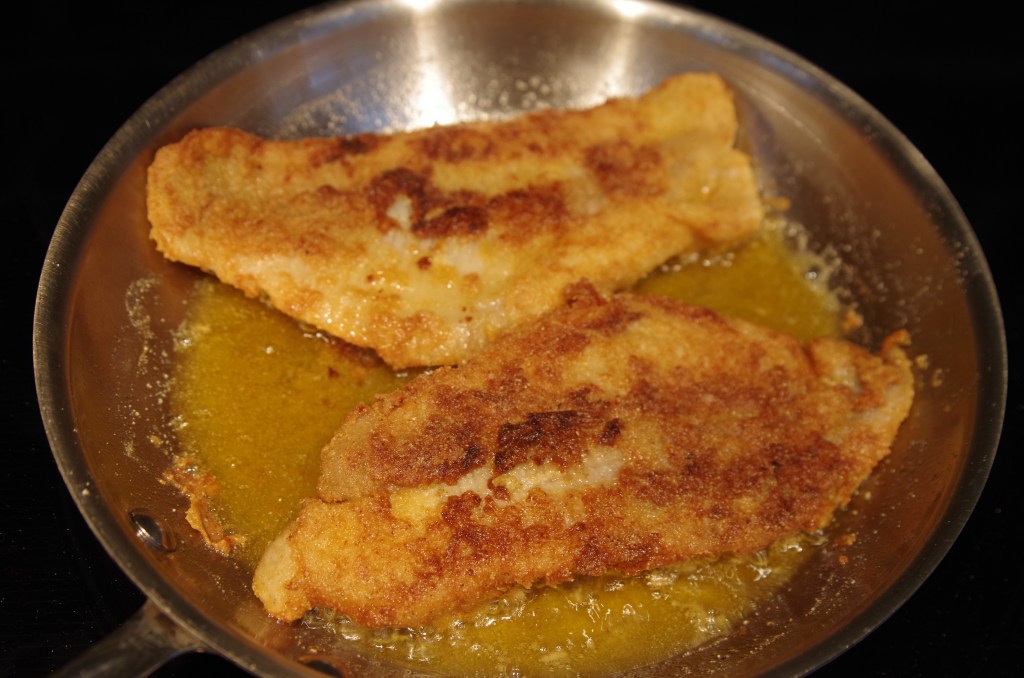
Rosie Mayes recommends serving the fish with lemon wedges and tartar sauce but I couldn’t resist serving mine with some Sriracha laced ketchup.

Was this the catfish from that long cherished moment 34 years ago? Did it curl my toes and have me dancing in victory at finally, FINALLY having achieved what I thought impossible? Absolutely!!!! Thank you Rosie Mayes!

Walking through Chinatown in Spring

When I was a little girl my family would go on Saturdays to New York’s Chinatown. I remember the curious scents of sweet cakes sold by cart vendors, of briny fish, of delicious roasting meats and occasional floral incense. There was always a great deal of noise from restaurant kitchens and bargaining shoppers, punctuated by the rattle of the subway below our feet.
As much fun as it was to window shop and people watch, my family was there really for one reason only… The Food. We are a family who loves to eat. I can easily recall watching with amazement as my father and grandmother ordered nine courses at a favorite restaurant and the management delivering seven of them to the table before gently recommending we take the last two home for the sake of our health!
We would walk from there along the streets and even after having eaten a seven course meal my father would buy Chinese pastries and little sweet hotcakes to eat on the way home. Mind you, they were all gone within a few minutes thanks to my Dad…
A favorite small plate my family liked to have on the side is a folded noodle dish called Cheung fun. I saw a recipe in a recently acquired copy of Wilson Tang’s “The Nom Wah Cookbook”. Nom Wah tea parlor is an establishment my family and I went to for a change of pace from our usual haunts. Intrigued I set out this fine spring day to make this dish I remember so fondly from my childhood. Mr. Tang gives a plain version ( my favorite as a child for it’s smoothness) as well as one that has shrimp and one that has cilantro and scallions. Since I didn’t have any shrimp but wanted something hearty enough to serve Martin and Byron for dinner, I combined two of the versions, substituted the shrimp for ground pork and swapped out the cilantro for some fresh chives I saw at our beloved favorite Farm stand (Montgomery place Orchards).

Nom Wah’s Cheung Fun (slightly altered)

Ingredients:
240g (1 1/2c) Glutenous Rice Flour
27g (3tbs) Tapioca Starch
9g (1tbs) Wheat Starch
12g (1tbs) Potato Starch
(1/2tsp) Salt
560g (2 1/2c) Luke Warm Water
228g (1/2 lbs) Ground Pork
Fresh Scallions, Sliced finely
Fresh Chives, Sliced finely

Method:

  • Generously Oil a 9″x13″ baking pan
  • Ready steaming equipment . I used my Combi-oven on steam setting but my grandma used to set an inch or two of water in a large stock pot and set a steamer basket in the water for the pan to rest on like a platform. Get the water to a boil and lower the temperature to a fast simmer.
  • Sift together Rice flour with the starches and salt before mixing in the lukewarm water. Whisk it well!
  • Pour enough of the batter into the pan to well coat the bottom. You don’t want it to be too thick or it will be hard to roll later.
  • Sprinkle on the pork and greens evenly and set to steam for 8-10 minutes.
  • The Cheung fun is ready when you see it bubbling.Remove from steamer and let cool until it is of a tolerable temperature for handling.
  • Roll it up, cover with a sweet and savory dipping sauce (recipe to follow) and garnish with more fresh herbs. I also added some sriracha for fun.
  • *Special note* You can make these in advance and just re steam them rolled up (but no sauce) for a few minutes to heat them up.

Sweet and Savory Dipping Sauce:

Ingredients:

120g (1/2c) Light soy sauce
180g (3/4c) Dark soy sauce
168g (3/4c) Sugar
228g (1c) water
1 1/2tsp Oyster sauce
1 1/2tsp Chicken powder (Chicken Bouillon powder)

  • Put all ingredients in small pot and heat on medium low until sugar is dissolved
  • This recipe makes a LOT of sauce! I cut it in half and there was still plenty.

Scones and Sympathy

My husband Martin is a wonderful man. He works hard for all of us and genuinely cares about what I would consider the important things in life. One of those is the well being of anyone who reports to him at his company. I know better than anyone how much brain space he allocates to making sure everyone is supported and looked after. This is why I was not surprised when he wanted to be involved in the planning of a special team building fun event.

What surprised me was some of them asking for me to teach a little video class on cooking or baking! Flattered beyond words, I set out to make a happy little event teaching an old recipe for scones I learned when vacationing in Wales from a Welsh innkeeper for what I thought would be maaaaaybe 6 or so people. I really had no idea.

Anyone in my life knows I love to go a bit extra when it comes to presents and care packages. Martin told me a budget and with it in mind I started making the “Baking boxes”. First I knew they would need a very helpful little tool called a “pastry cutter” and along with it the dry ingredients. It occurred to me that just scones would be sad without tea. So for each person I included some loose leaf Assam I portioned out in little paper tea sachets. Then came the thought, “Tea and scones with no jam?”. It didn’t bear any further thought and so each box simply required a small jar of my homemade jam. At this point the package seemed in good stead but still missing something. It then made perfect sense to provide the soft caramels I often make for Byron and his friends. After all what was tea time without a little sweet to enhance the experience? See what happens when no one reigns me in?

Martin then drops the news that we needed 27 of those packages out in less than a week! Eeek!

After some significant hustle and some shared laughs with the mail carrier when she came to pick them up, the packages were out and on their merry way with a dear hope that they might bring a little joy.

Scones

Ingredients:

  • 227g (1c + 1/4c + 3tbs) All Purpose Flour
  • 1tsp Baking Soda
  • 1tsp Cream of Tartar
  • 28g (2tbs) Salted Butter
  • 200g (3/4c) Buttermilk

Method:

  • Heat oven to 425F (400F Convection setting)
  • Mix together the flour with baking soda and cream of tartar
  • Using your pastry cutter, cut in the butter until the mixture resembles very coarse crumbs
  • Making a well in the center, pour in the buttermilk and combine just until a very shaggy looking dough comes together. Do not over mix!!! This is very important if you want your scones to be as light as feathers and not cannonballs!
  • Tip the dough onto a parchment lined cookie sheet. At this point you could make them into freestanding individual scones by dividing them evenly (I use a scale to make sure each portion is equal in size) or continue on with the next few steps.
  • Wet your hands before smoothing and gently patting the dough into a circle roughly 6 inches in diameter. (Wetting your hands makes sure that the dough doesn’t stick to you)
  • Next using a wet blade make 4 cuts so that the disk now looks like a wagon wheel. (If you rinse the blade after each cut it will make a nicer division)
  • Bake the scones for 12-14 minutes, more or less depending on how hot your oven runs. They are done when they are puffed and have a lovely golden crust.
  • Let cool for as long as you can stand it before consuming.

If you can wait long enough until the scones are completely cool (and I would salute your self restraint!), you could load it with a myriad of delicious toppings. Clotted cream layered with jam and or fresh fruit come to mind … Or very thick whipped cream sprinkled with chocolate chunks and crispy freeze dried raspberries. You could even go savory with cheese and caramelized onions garnished with finely sliced scallions. Whatever you choose the day is yours!

The long trek to spring….

Winter for me is a test of endurance. As the daylight hours shorten and the daily high plummets I am firmly ensconced indoors. Here in a toasty warm kitchen with many windows I can see a dreamscape the snow has painted and sip hot tea while I watch for the turn of the seasons. I can smell it on the breeze, that special sweetness only the air in the earliest whispers of spring carries. Sunny warmth and rebirth is close and that’s the thought that gets me out of bed in the morning.
For weeks the cold had kept me firmly in the Northern Hemisphere . Some days Russian lamb pelmeni with adjeka cut by melted butter graced the table. Others the heartiness from the Alps in the form of Venison Schnitzel served with my own handmade spaetzle, accompanied by sauteed and spiced apples took center stage. Yet other days saw Mongolian dumplings bring bright smiles to my husband and son’s faces.
I enjoyed my time in these snow blanketed places but as the snow has melted and the air warms rapidly, the food migration is urging me on towards the British Isles and Fair France. Today I worked with a recipe in “Bake From Scratch : Volume Five” by Brian Hart Hoffman. I own all five volumes and have always found the quality of the recipes reasonably reliable and only sometimes needing altering. On page 43 I found a recipe for “Irish Sponge Cake with Strawberry Preserves and Cream” and the mental wheels started to turn!
Since the migration has taken me simultaneously to Ireland and France why not take the recipe for this delightful two layer cake and replace the whipped cream filling for something a little more interesting and perhaps French? It then occurred to me that there is a recipe for Strawberry Mousse on page 29 of a wonderful book called “La Vie Rustic” by Georgeanne Brennan. As soon as Byron left the kitchen for school (He walks across our back yard to Martin’s office cottage because the wifi is better there for remote learning) I was opening the cupboards and embarking on my cake adventure.
The first step was to examine the base cake recipe. Here below is the ingredient list for the cake:

  • 1 3/4c (219g) Self rising Flour
  • 4 Large Eggs (200g) – At room temperature
  • 1c (200g) Castor Sugar
  • 1c (227g) Unsalted Butter – At room temperature

Pretty simple right? While this ingredient list is sound the method that followed it left some room for improvement. Instead of simply mixing all the ingredients together like the recipe said I went with the traditional creaming method for cakes. Setting aside the flour, and setting the oven to 350F (325F convection setting), I beat the sugar with the butter until the mix was light and fluffy. Then, one by one the eggs are added before the flour is slowly integrated.

The smooth and creamy looking batter is poured in even portions between two 8 inch round cake pans buttered and bottom lined with parchment circles.
Into the oven for a 20 minute bake with doneness tested by toothpick. While the cake layers cool it’s time to make the strawberry mousse!

Strawberry Mousse :

  • 1 pint (250g) Strawberries – washed, stemmed and cored
  • 1/3c (90g) Sugar
  • 1/4c (56g) Water
  • 1tbs (12g) Unflavored Gelatin
  • 1c (240g) Heavy cream

First thing is to pour the water into a small pot and sprinkle over the gelatin. Then puree the berries before mixing in the sugar and setting it aside.

Next whip the cream to stiff peaks. At this point a very delighted looking child might skip into the kitchen between lessons hoping to get a spoonful of whipped cream. Once said child has been obliged it is a good time to warm the water and gelatin on the stove top until combined and completely melted.

Integrate with the strawberry puree and gently fold in the whipped cream. And that is strawberry mousse!

With all components ready it is time to build that cake. A layer of cake is the supporting base with the mousse piped over it as a nice thick cloud-like blanket.

Following that the second cake layer is added creating the appearance of a giant cookie sandwich or moon pie.


All that is needed is a light dusting of powdered sugar topped with a pretty strawberry and mint garnish to complete it

This little cake was delicious and left me hungry for spring!

Follow My Blog

Get new content delivered directly to your inbox.